Click the LayoutRoot in the Objects and Timeline panel to make sure it is the active canvas.
Choose File > Import Adobe Photoshop File, navigate to the module01_assets folder and double-click the sl0101.psd file. The Import Adobe Photoshop File dialog box appears.
Using this dialog box, you can turn off and on the layers that you want to retain, or, choose to merge some or all the layers. In this example, you will merge two of the layers to see the results in Expression Blend.
Be sure that you are seeing the layers in their original form. If the Reset All button is active, press it. You should see all htree layers checked, Border, YellowTint, and BlackBG.
In the Import Adobe Photoshop dialog box, click the checkbox to the left of the layer named Border to hide that layer when imported.
Click the YellowTint layer, then Shift+click the BlackBg layer to select both layers simultaneously.
Click Merge layers to combine these two layers into one canvas when imported into Expression Blend.
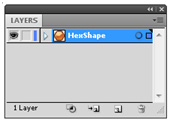
Double-click the Merge Layers 1 name and type beehive into the textfield. You can choose to hide or merge layers when importing into Expression Blend.
Press OK. The Photoshop file is opened in the Silverlight project. Note: Any files saved out of Adobe Photoshop must be saved in the RGB format in order to import into Expression Blend. Also note that Photoshop effects are not compatible with Expression Blend at this time and will be ignored.
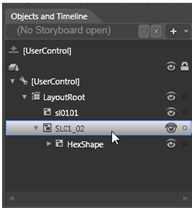
Look at the new canvas named sl0101 located in the Objects and Timeline panel, and expand it to see that the named image beehive, is now contained within sl0101 canvas.
Before taking the Photoshop file further by editing it in Expression Blend, you will import an Adobe Illustrator file.
Importing an Adobe Illustrator file
In this next section, you will take artwork created in Adobe Illustrator and import it into Expression Blend. This is an excellent workflow, as it allows designers to work in a software package that already has well-developed precision drawing tools.
Navigate to the module01_assets folder and double-click the file named SL01_02. The imported file is placed as vector artwork in Expression Blend. You might have to use your scrollwheel to zoom back a bit to see the object. Look in the Objects & Timeline panel to see that a canvas was automatically created, using the name of the file SL01_02. Note: Adobe live effects, blend modes, and the symbol sprayer are not supported. When you import an Adobe Illustrator file, Expression Blend 3 Preview will display a message to let you know if any features of the imported file are not supported, and what actions you can take.
Reveal the contents of the new canvas named SL01_02 located in the Objects and Timeline panel, to see the HexShape (named layer from Adobe Illustrator) is now a canvas contained within the SL01_02 canvas.
If you were to open this original Adobe Illustrator file, you would see that these are the named layers imported and converted to a named canvas in Expression Blend. This integration can be hugely beneficial to the developer, as buttons and other objects can be included in named layers to help organize objects into separate layout containers in Expression Blend.
Click the canvas for SL01_02, notice a large selection that really contains no useful data. Typically, an empty canvas imports with an Adobe Illustrator file. In this next step, you remove it.
In order to remove the larger SL01_02 canvas, select the SL01_02 canvas in the Objects and Timeline panel, and then choose Object > UnGroup. You have the HexShape canvas independent of the larger canvas.
Choose File > Save, or press Ctrl+S to save this project and then keep this file open for the next part of this lesson. You are not prompted to name the file, as you named and set the save location when you initially created the project. Tip: You can also select an object(s) in Adobe Illustrator and choose Edit > Cut, then return to Expression Blend and choose Edit > Paste. Layer information is not converted to layout controls using this method.